1.
Setup Visual Studio Project
To set up a Visual Studio project:
1. In Visual Studio, create an ASP.NET Class
Library Project and name it CustomSubmit
2. Add the following references:
·
Sitecore.ExperienceForms
·
Sitecore.ExperienceForms.Mvc
·
Sitecore.Kernel
·
Sitecore.Analytics
·
Sitecore.Mvc
·
Sitecore.MVC.Analytics
2.
Create the submit action class
To create a submit action class:
1. Create a class named ContactFormData. This is
the data structure class used for our ContactUs Submit Action
public class ContactFormData
{
public Guid EmailFieldId { get; set; }
public Guid QuestionFieldId { get; set; }
}
2. Create a static FieldHelper class. This helper
class is used to get values from form fields.
public static class FieldHelper
{
public static IViewModel GetFieldById(Guid id, IList<IViewModel>
fields)
{
return fields.FirstOrDefault(f => Guid.Parse(f.ItemId) == id);
}
public static string GetValue(object field)
{
return field?.GetType().GetProperty("Value")?.GetValue(field,
null)?.ToString() ?? string.Empty;
}
}
3. Create the ContactUs
class. Inherit this
class from the SubmitActionBase class and override the abstract Execute method.
public class ContactUs :
SubmitActionBase<ContactFormData>
{
public ContactUs(ISubmitActionData submitActionData) : base(submitActionData)
{
}
protected override bool Execute(ContactFormData data, FormSubmitContext
formSubmitContext)
{
var fields = GetFormFields(data, formSubmitContext);
var values = fields.GetFieldValues();
//Your Code Here for any custom Logic
return true;
}
private ContactFormFields GetFormFields(ContactFormData data,
FormSubmitContext formSubmitContext)
{
return new ContactFormFields
{
Email = FieldHelper.GetFieldById(data.EmailFieldId,
formSubmitContext.Fields),
Question = FieldHelper.GetFieldById(data.QuestionFieldId,
formSubmitContext.Fields),
};
}
internal class ContactFormFields
{
public IViewModel Email { get; set; }
public IViewModel Question { get; set; }
public ContactFormFieldValues GetFieldValues()
{
return new ContactFormFieldValues
{
Email =
FieldHelper.GetValue(Email),
Question =
FieldHelper.GetValue(Question)
};
}
}
internal class ContactFormFieldValues
{
public string Email { get; set; }
public string Question { get; set; }
}
}
3.
Create the Contact Us Action Editor Item
Before you can create the Contact Us submit
action item, you must create the SPEAK control editor for mapping the form
fields to the ContactFormData
To create the Contact Us Action Editor item:
1. Create a JavaScript file and name it ContactUs.js.
2. Copy the following script to the file
(function (speak) {
var parentApp = window.parent.Sitecore.Speak.app.findApplication('EditActionSubAppRenderer'),
designBoardApp = window.parent.Sitecore.Speak.app.findComponent('FormDesignBoard');
var getFields = function () {
var fields = designBoardApp.getFieldsData();
console.log("fields : ");
console.log(fields);
return _.reduce(fields,
function (memo, item) {
if (item && item.model && item.model.hasOwnProperty("value")) {
memo.push({
itemId: item.itemId,
name: item.model.name
});
}
return memo;
},
[
{
itemId: '',
name: ''
}
],
this);
};
speak.pageCode(["underscore"],
function (_) {
return {
initialized: function () {
this.on({
"loaded": this.loadDone
},
this);
this.Fields = getFields();
this.MapContactUsForm.children.forEach(function (control) {
if (control.deps && control.deps.indexOf("bclSelection") !== -1) {
control.IsSelectionRequired = false;
}
});
if (parentApp) {
parentApp.loadDone(this, this.HeaderTitle.Text, this.HeaderSubtitle.Text);
parentApp.setSelectability(this, true);
}
},
setDynamicData: function (propKey) {
var componentName = this.MapContactUsForm.bindingConfigObject[propKey].split(".")[0];
var component = this.MapContactUsForm[componentName];
var items = this.Fields.slice(0);
if (this.Parameters[propKey] &&
!_.findWhere(items, { itemId: this.Parameters[propKey] })) {
var currentField = {
itemId: this.Parameters[propKey],
name: this.Parameters[propKey] +
" - " +
(this.ValueNotInListText.Text || "value not in the selection list")
};
items.splice(1, 0, currentField);
component.DynamicData = items;
$(component.el).find('option').eq(1).css("font-style", "italic");
} else {
component.DynamicData = items;
}
},
loadDone: function (parameters) {
this.Parameters = parameters || {};
_.keys(this.MapContactUsForm.bindingConfigObject).forEach(this.setDynamicData.bind(this));
this.MapContactUsForm.BindingTarget = this.Parameters;
},
getData: function () {
var formData = this.MapContactUsForm.getFormData(),
keys = _.keys(formData);
keys.forEach(function (propKey) {
if (formData[propKey] === null || formData[propKey].length === 0) {
if (this.Parameters.hasOwnProperty(propKey)) {
delete this.Parameters[propKey];
}
} else {
this.Parameters[propKey] = formData[propKey];
}
}.bind(this));
return this.Parameters;
}
};
});
})(Sitecore.Speak);
3. deploy the ContactUs.js file to your website
in the following folder: <YourInstance>\Website\sitecore\shell\client\Applications\FormsBuilder\Layouts\Actions

4. Connect to your Sitecore Website through
Sitecore Rocks.
5. To create a Contact Us Action Editor Sitecore
item, in Sitecore Explorer, expand the core database and navigate to /sitecore/client/Applications/FormsBuilder/Components/Layouts/Actions
6. Right-click Actions, click Add, and
click New item.
7. n the Add New Item dialog box,
search for and click Speak-BasePage enter the name ContactUs,
and click OK.

8. Right-click the ContactUs item you just
created and click Tasks, and click Design Layout.
9. On the Design Layout tab of the item that you
just added, update the Layout field to Speak-FlexLayout
10. In the upper-left corner, click Add Rendering
and Search and insert a PageCode rendering

11.
Open the properties
window of the PageCode rendering. Update the PageCodeScriptFileName value to the file location of the ContactUs.js file.
For example: /sitecore/shell/client/
Applications/FormsBuilder/Layouts/Actions/ContactUs.js .
12. Update
the SpeakCoreVersion value to SPEAK 2-x

13. Then, proceed to these renderings at the
Design Layout window.

4.
Add the Text Rendering Parameters
1. Navigate to the ContactUs Action Editor item
you just created, and add a PageSettings item.

2. Navigate to the PageSettings item, and search
for and click the Text Parameters rendering, and click Add to add three items:
HeaderTitle, HeaderSubtitle, and ValueNotInListText

3. For the three items, Right Click and Edit the
following fields.
·
IsVisible –
Deselect
·
Edit the text:
HeaderTitle: Map form fields to user
registration data
HeaderSubtitle: Map the fields in the form to the user profile
details
ValueNotInListText: Value not in the selection
list.

4. Navigate to the PageSettings item, add a
folder, and name it MapContactUsForm
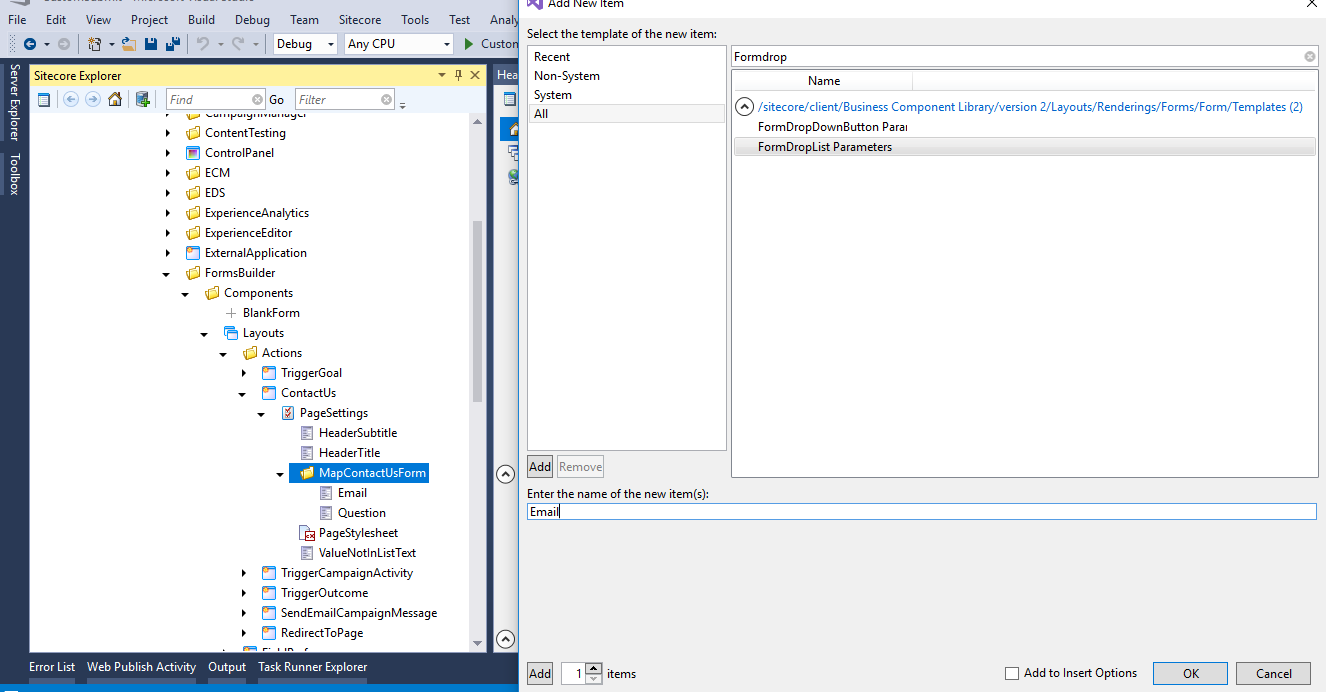
5. Search for and click the FormDropList
Parameters, click Add to add
·
Email
·
Question
6. Update the field values of these items according
to the following table:
FormDropList Parameter
|
ValueFieldName
|
DisplayFieldName
|
FormLabel
|
BindingConfiguration
|
Email
|
itemId
|
name
|
Email
|
emailFieldId/SelectedValue
|
Question
|
itemId
|
name
|
Question
|
questionFieldId/SelectedValue
|
7. Finally, add a Page-Stylesheet-File item and
name it Stylesheet. Update the Stylesheet field value to
/sitecore/shell/client/Applications/FormsBuilder/Layouts/Actions/Actions.css

Your
item and its tree structure should look like the highlighted one:

5.
Create the Contact Us Submit Action Item
To create the Contact Us submit action item:
1. In Content Editor navigate to path /sitecore/system/Settings/Forms/Submit
Actions
2. Right-click Submit Actions, click Insert, and
click Insert from template.
3. Click the /System/Forms/Submit Action
template, in the Item Name field, enter the name ContactUs and click Insert.
4. Navigate to the item you just created and in
the Settings section, in the Model Type field, set the value to your ContactUs
class type
name: CustomSubmit.ContactUs,CustomSubmit
5. In the Error Message field, enter the error
message: Unable to submit
6. In the Editor field, click the editor you just
created: ContactUs. Item will look like this:

7. Save item.
6.
Create Contact Us Form
To create form:
1. On the Forms dashboard, click Create.
2. Create a form with the following fields:
Type
|
Label
|
Field Name
|
CSS
Class
|
Email
|
Email
|
Email
|
form-control
|
Multiple-line text
|
Question
|
Question
|
form-control
|
Submit
|
Submit
|
SubmitBtn
|
btn btn-default
|
The
form will look like this:

3. To add a Submit button on your form, in the
Form elements pane, in the Structure section, drag the Submit button element to
the form.
4. Click Submit actions and
click Contact Us

5. Select the Submit Action and click pencil icon
to Edit. This will open a dialog box to map form fields to Contact Us Form
data.
6. In the Map form fields to contact us form data
dialog box, select the corresponding form fields.

7. Save the form and name it: Contact Us Form.
7.
Create the MVC layout
To create an MVC Layout:
1. In your website Views folder, create a folder
and name it ValueProvider.

2. In the Content Editor, navigate to Layout/Layouts,
and insert a layout folder and name it Value Provider

3. Right-click the Value Provider folder and
click Insert and MVC Layout.
4. Name the layout MVC Layout and place it in the
Value Provider folder that you created earlier.
5. Go to your Visual Studio project and create a
folder named Views.
6. Create an empty view without model named MVC
Layout.cshtml. The name of the View must be the same as the name of the MVC
layout that you created in the Content Editor:
@using Sitecore.Mvc
@{
Layout =
"~/Views/MvcOuterLayout.cshtml";
}
<nav class="navbar navbar-inverse
navbar-fixed-top">
<div
class="container">
<div class="navbar-header">
<a
class="navbar-brand" href="#">
@Html.Sitecore().Field("title")
</a>
</div>
</div>
</nav>
<div class="container">
<div
class="row">
@Html.Sitecore().Placeholder("main")
</div>
</div>
7. In the same folder, create a file named
MvcOuterLayout.cshtml and copy the following code to the file
@using Sitecore.Mvc
@using Sitecore.ExperienceForms.Mvc.Html
@using Sitecore.Mvc.Analytics.Extensions
@{
Layout = null;
}
<!DOCTYPE html>
<html lang="en"
xmlns="http://www.w3.org/1999/xhtml">
<head>
<title>
@Html.Sitecore().Field("title",
new { DisableWebEdit = true })
</title>
@Html.Sitecore().VisitorIdentification()
<link
rel="stylesheet"
href="https://maxcdn.bootstrapcdn.com/bootstrap/3.3.7/css/bootstrap.min.css"
integrity="sha384-BVYiiSIFeK1dGmJRAkycuHAHRg32OmUcww7on3RYdg4Va+PmSTsz/K68vbdEjh4u"
crossorigin="anonymous">
<link
rel="stylesheet"
href="http://maxcdn.bootstrapcdn.com/font-awesome/latest/css/font-awesome.min.css">
@Html.RenderFormStyles()
@Html.RenderFormScripts()
</head>
<body
style="padding-top: 70px;">
@RenderBody()
</body>
</html>
8. Deploy all Views to your Views/ValueProvider
folder in your website
8.
Create the MVC layout
To add Contact Us form to web page:
1. Navigate to /sitecore/Content, right-click
Home, click Insert, click Sample item.
2. Enter Contact Us and click OK.
3. On the Presentation tab, click Details. In the
Layout Details dialog box, click the default layout to change it.
In the Device Editor dialog
box, from the drop-down list, click Layouts/MVC Layout
4. On the Controls tab, remove all the
renderings, and click Add.
5. Navigate to Renderings/System/Forms and click
Mvc Form. In the Select a Rendering dialog box, in the Add to Placeholder
field, enter main, and then click Select.
6. On the Controls tab, click the MVC form
control and click Edit. In the Data Source field, click Browse and select the
form you want to add to the page. For this example, select Register Form
7. Publish the form, layouts, and items along
with their children in previous steps.
8. Load the register page in a browser and submit
your contact us form.